Showing posts with label Blogspot Hack. Show all posts

Top commentators for blogger blog

9:58 AM

(0) Comments

Now blogger had shown it grow very fast. Now we can display who give most comment in your blog. I had use this Top commentators for blogger blog on my blog.There are two way for you to add Top commentators in your blog.
1.bloggerbuster
2.googlesystem

I had try to use bloggerbuster but i didn't work in my blog. Then i found googlesystem and it worked.

Bloggerbuster: Just insert your blog name and your name, click add to blog. * just follow the instruction. Go tobloggerbuster now.

Googlesystem: Copy and paste the code, change the BLOGNAME.blogspot.com into yours.

kaitor

Create harizontal tabs menu in our blog

9:04 PM

(0) Comments

Harizontal tabs menu is important in our blog. It is not easy to learning coading in a minute, so the option is we learn slowly by copy and understand it as i do.


Before start, you need to create image as below:


size:175px × 84px


size:4px × 84px

1. Login to Blogger, chose "Lay out --> Template --> Edit HTML"
2. Don't forget to backup your template first.
3. Check the "Expand Widget Templates" checkbox.
4. Try to find this code ]]>, if you found it then put the code below above it

#tabshori {
float:left;
width:100%;
font-size:13px;
border-bottom:1px solid #2763A5;
line-height:normal;
}
#tabshori ul {
margin:0;
padding:10px 10px 0 50px;
list-style:none;
}
#tabshori li {
display:inline;
margin:0;
padding:0;
}
#tabshori a {
float:left;
background:url("http://yourimagehosting/blackleft.gif") no-repeat left top;
margin:0;
padding:0 0 0 4px;
text-decoration:none;
}
#tabshori a span {
float:left;
display:block;
background:url("http://yourimagehosting/blackright.gif") no-repeat right top;
padding:5px 14px 4px 4px;
color:#24618E;
}
#tabshori a span {float:none;}
/* End IE5-Mac hack */
#tabshori a:hover {
background-position:0% -42px;
}
#tabshori a:hover span {
background-position:100% -42px;
}

5. Next step is to put the tabs menu into your blog, but we need to create add page element at the top of you post section.

Find the below code :

<b:section class="header" id="header">
maxwidgets='1' showaddelement='no'>
<b:widget id="Header1" locked="true">
title='your blog title (Header)' type='Header'/>
</b:widget>

change the red text so that to become like this:

<b:section class="header" id="header">
maxwidgets='2' showaddelement='yes'>
<b:widget id="Header1" locked="false">
title='your blog title (Header)' type='Header'/>
</b:widget>

6. Then copy the code below


<div id="tabshori">

<ul>
<li><a href="http://yourblogname.blogspot.com/">Home</a></li>
<li><a href="http://yourblogname.blogspot.com/">Trik-Tips</a></li>
<li><a href="http://yourblogname.blogspot.com/">Free Template </a></li>
<li><a href="http://yourblogname.blogspot.com/">Blog Dictionary</a></li>
<li><a href="http://draft.blogger.com/yourblogname.blogspot.com">Profile</a></li>
</ul>
</div>


Save your setting, the go to "Page Elements" and click "Add page Element " on the header area, chose "HTML/JavaScript" then put the number five code above into "content" box, then click "save" and preview your new blog. < >

kaitor

Tab view for blogspot

8:01 AM

(0) Comments

Want something different in your blog? There is a lot of thing you can do to make your blog different from others. Tab view is one of it, and its not really difficult to create tab view in your blogspot. Just follow this instruction step by step and carefully. Remember to backup your template for your blog safety.


1. Login to blogger, go to "Layout --> Edit HTML"

2. Then find this code ]]></b:skin>

3. Insert the below code before ]]></b:skin> or in CSS tag.


div.TabView div.Tabs

{

height: 24px;

overflow: hidden;

}

div.TabView div.Tabs a

{

float: left;

display: block;

width: 90px; /* Width top main menu */

text-align: center;

height: 24px; /* Height top main menu */

padding-top: 3px;

vertical-align: middle;

border: 1px solid #000; /* Top Main menu border color */

border-bottom-width: 0;

text-decoration: none;

font-family: "Times New Roman", Serif; /* Top main menu font */

font-weight: 900;

color: #000; /* Top main menu font color */

}

div.TabView div.Tabs a:hover, div.TabView div.Tabs a.Active

{

background-color: #FF9900; /* Top main menu background color */

}

div.TabView div.Pages

{

clear: both;

border: 1px solid #6E6E6E; /* Content Border color */

overflow: hidden;

background-color: #FF9900; /* Content background color */

}

div.TabView div.Pages div.Page

{

height: 100%;

padding: 0px;

overflow: hidden;

}

div.TabView div.Pages div.Page div.Pad

{

padding: 3px 5px;

}
 4. You can change the code according to the red text explanation. To get html color code see HERE

5. The next step is put the code below before


<script src='http://superinhost.com/trikblog/tabview.js' type='text/javascript'/>


6. Then "save" it.

7. Go to "Page Elements" menu

8. Chose "Add Page Element" --> "HTML/Javascript" in place where you want to put this tab.

9. Insert this code :


<form action="tabview.html" method="get">

<div class="TabView" id="TabView">

<div class="Tabs" style="width: 350px;">

<a>Tab 1</a>

<a>Tab 2</a>

<a>Tab 3</a>

</div>

<div class="Pages" style="width: 350px; height: 250px;">


<div class="Page">

<div class="Pad">

Tab 1.1 <br />

Tab 1.2 <br />

Tab 1.3 <br />

</div>

</div>


<div class="Page">

<div class="Pad">

Tab 2.1 <br />

Tab 2.2 <br />

Tab 2.3 <<br />

</div>

</div>


<div class="Page">

<div class="Pad">

Tab 3.1 <br />

Tab 3.2 <br />

Tab 3.3 <br />

</div>

</div>


</div>

</div>

</form>


<script type="text/javascript">

tabview_initialize('TabView');

</script>


Note :

- The number or the blue text(350px) Is size of the tabview.

- The green code is the main menu text

- The red code is the content of tabview. you can fill it with links, banner, widget, comment or anything.

- To add more menu, see on the blink code. Add the code under it.

kaitor

How to backup blogger widgets while changing blogger template

2:37 AM

(1) Comments

Are you often changing your blog template? What will you do if the blogger widgets need to delete? This is the major problem for blogger user. They will loss their widgets even if they take backup of their template. After Changing their template , they need to add widgets again manually. It's really annoying and time consuming process.


How to backup blogger widgets?


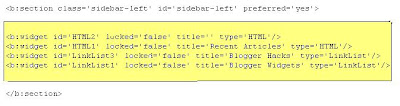
Before changing template search your widgets code without putting check in expand widgets box.


Select the widget code as shown in the image above.

*if you have more than one widget, search it, copy it into notepad.


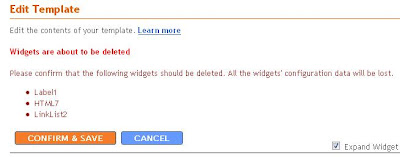
After uploading you will get a message such as picture below:


Don't click Confirm & save tab. Search for the following code <b:widget id=' . Now paste the widget codes you have saved above or below the code in yellow


Save your new template. Done :)


This method is very useful compare add widgets again manually.


Still don't get it... watch the video.

kaitor

Display recent comment in your blog

8:17 PM

(0) Comments

What is the purpose to display recent comment? One of the best answers I guess is, give you blog reader chance to show off their idea or opinion in your blog. This is another way for you to gain traffic for your blog. I will focus on blogger, how you can add recent comment in your blog.

1. Login into your blogger account
2. Go to layout and select Page Elements.
3. Select Feed


4. Put your comments feed url in the space provided and click continue.


5. Change the title to Recent Comments or any name
6. Decide where you wanted to put recent comment in your blog.

Complete !!! :)

kaitor